I’ve been blogging for years. I started on a personal blog in 2012, launched a blog for teen writers that I ran from 2013-2016, and now I write on Entwine Web Design and occasionally my writer blog over at amyisamanbooks.com.
It took me a while to learn to write a blog post and figure out a process to support a consistent blog schedule.
Now, I LOVE blogging.
Even if it did nothing for my business, I’d still blog. But since it totally helps drive traffic to my website it’s a win/win.
However, I’ve got clients for whom blogging is a huge struggle, and I totally empathize with them. It’s kinda how I feel about Instagram – I don’t have a process, so I don’t post consistently.
When it comes to blogging, I’ve learned how to write a blog post and refined a blogging process and system. There are overwhelming lists out there with tool after tool after tool for bloggers, but I have a few indispensable tools for writing my posts.
In the case of my blogging life, less is more, and a clear-cut process for completing those blogs with some helpful tools can make blogging easier.
If you’re feeling overwhelmed with getting started blogging, here’s a sneak peek into my blogging process and the tools that I use to help me create consistent blog content.
Here’s a basic outline on how to write a blog post:
1) Brainstorm some ideas related to your industry or area of expertise. If you don’t feel “like an expert” you can absolutely start with a few posts sharing your story of how you got to where you are in your life or business.
Those are GREAT for beginning to establish your writing voice and getting started. If being a bit open and sharing your story feels a little too vulnerable a place to start, go back to industry topics that you know well and start there.
2) Capture your post ideas (there are easy tools for that listed below)
3) Write your post – shoot for 500-2000 words
4) Add an image or two
5) Edit and revise your post
6) Share your post so you can get some readers
That’s it! It’s a basic “get an idea, write it, publish it” process. Then, rinse and repeat.
This list of ten tools is what I use to complete the above steps, each and every week and help me tremendously with blogging consistently.
Capturing and Organizing Blog Post Ideas
I’ve tried many tools for this over the years: Evernote, Trello, Excel, & Scrivener to name a few, but every time I go back to my two favorites:
#1) Pen and Paper
I get ideas at random times, and I jot them down on post-its, scraps of paper, and notebooks. Sometimes I outline a whole post, and other times I write down topic ideas.
If I don’t have access to pen and paper, like if I’m on a walk or run, I’ll send myself an email with my ideas.
Eventually, I’ll have a stack of random pieces of paper and emails, and I’ll compile all of my ideas into my favorite WordPress blogging plugin, editorial calendar.
#2) WordPress Editorial Calendar
I use my editorial calendar to capture new ideas if I’m sitting at my computer. This is a free WordPress plugin, and it’s seriously one of my favorite WordPress plugins.
It’s the best tool for organizing ideas and planning out your blogging calendar.
Basically, the editorial calendar plugin creates a calendar for your blog posts. To get started, install the editorial calendar plugin. Activate the plugin and open it up. You’ll see “Calendar” as an option under the Posts category in your WordPress Dashboard.
First, hover over any future date and click on Quick Edit. Create a new post titled “Post Idea Brainstorm.” In the quick edit box that pops up, this is where you can keep a list of all of your new ideas as they come to you or when you can compile your lists of notes you’ve kept on paper.
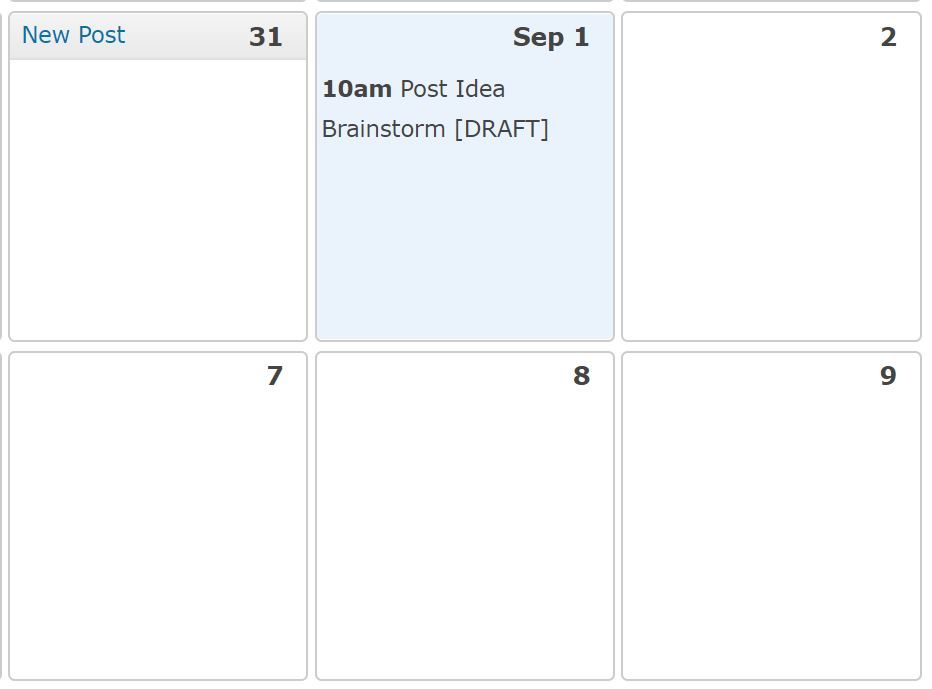
This is not a post that will EVER get published – it will be your running list of future blog post ideas, all kept neatly organized right on your blog.
When you get a new idea or have a pile of post-its, you can add them to this list where it’s nice and handy when you’re ready to write a new post.
If you want to expand one of those ideas in your list into a full blog post, open your “Post Idea” quick edit box. Select the topic and cut it (ctrl-x).
Now, hover over the date you want to post your new blog post. The “new post” option will come up. Again, click on Quick Edit and you can paste your title and any notes/ideas for that post. When you’re ready to actually write the whole thing, hover over the title and click on edit and you’ll go directly to the WordPress Post editor.
If you’d like to schedule your new post, you can leave it on the calendar, or you can drag it over to the right sidebar where’s there’s a list of Unscheduled Posts.
This list of Unscheduled Post serves as my resource of half-written posts which is a great resource for future posts.
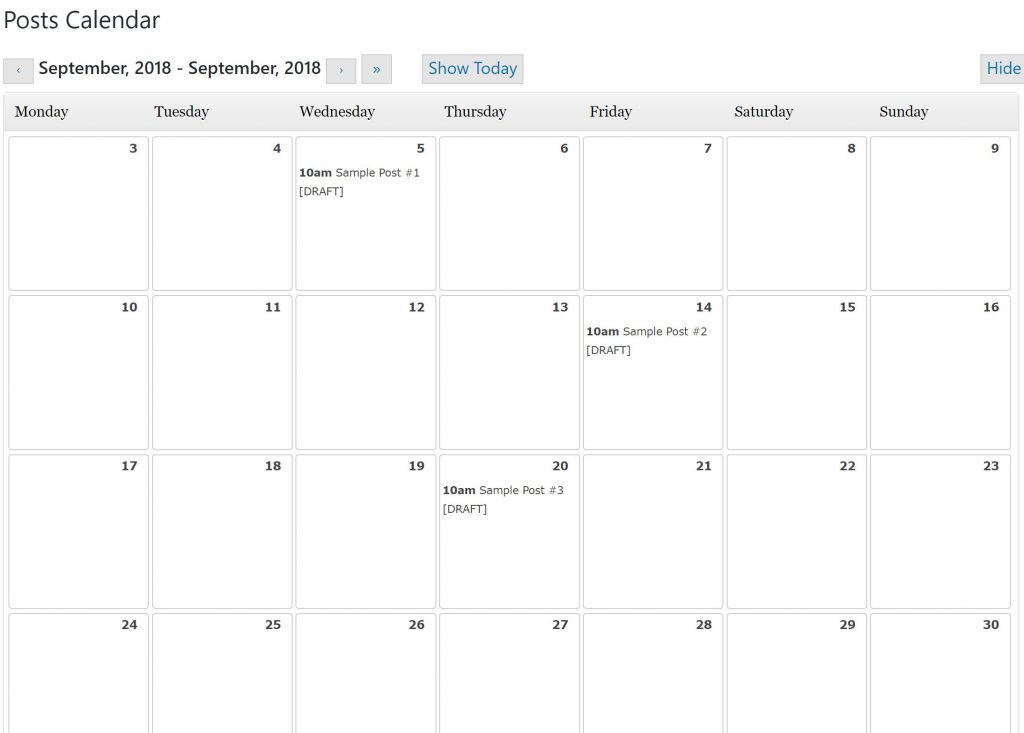
The calendar function is also great if you like to blog on themes. You can visually see what posts go where and the order that you’re writing them in. If you’re a visual person like me, this can really help with your organization.
The calendar view also helps me to schedule my posts and really keeps me blogging consistently.
It’s WAY easier for me to keep all of my blogging ideas and topics right on my blog rather than another organizational platform like Evernote or Scrivener (though I do use Scrivener for almost all of my email copy)!
Researching & Writing Blog Posts
When I’m blogging, if it’s appropriate, I like to add stats and research to support whatever point I’m trying to make.
#3) DeepDyve
My favorite resource for finding quality research is deepdyve.com.
DeepDyve has a paid version, but I use the free version. It does take some sorting through to find quality resources, but any online research project requires spending time evaluating resources.
#4) Google
I also rely on good ol’ Google. Again, it can take quite a bit of time to verify the credibility of sources found with Google, but taking the time to do this absolutely can add credibility to a blog post.
Once you’ve got your ideas and your research, it’s time to write your post.
Be sure to structure your blog content, so online readers can easily consume it.
Adding an Image
#5) Photo Sites
I try to add at least a few images to the body of each blog post, similar to what I did with the two “editorial calendar” screenshots above. Images help break up the text and can make it easier to scan.
Because I’m blogging on website strategy and design, taking screenshots makes sense. If that doesn’t “fit” for your brand or topic my three favorite sites for finding blog post images are unsplash.com, pixabay.com, and pexels.com.
#6) Canva
If you’d like to get fancy and add some text or graphics to your image, Canva is a great free tool for that.
Editing & Proofreading
Be sure to take some time to edit and proofread. When I read a blog post, I’m totally okay if there’s a typo somewhere, but if it’s rife with errors, I’ll leave. To me, it’s an indication that the writer either doesn’t care that much about what they’re putting out there OR they’re too lazy to fix it. Maybe that’s harsh, but a post with a ton of errors absolutely makes me doubt a person’s credibility and their level of “give-a-shit.”
Be sure to take a few minutes to re-read your posts and catch your errors. Thankfully, Grammarly can TOTALLY help with this.
I’ll be honest, I’m a grammar NERD – I’m a writer and spent 15 years teaching English at the high school and college levels. I know how to write and punctuate a sentence and could spend an hour over coffee discussing the merits of active vs. passive voice. Because writing correctly is a strength, I wasted hours of my time by being a snob and thinking I didn’t need Grammarly. Don’t be me!!!
Install Grammarly right now. It’s free and it’s such a life-saver, catching typos, comma errors, verb agreement errors etc.
#7) Grammarly
Grammarly is the BEST for making sure my posts are written accurately.
I have the Grammarly Chrome Extension added to my browser, so it catches errors as I type (which I love). It also catches errors not only on my blog posts but also on social media posts. Anything it thinks is wrong, it underlines in red, so you can easily find and correct it. To install, go to the Chrome extensions store and search for Grammarly.
Like any grammar checker, it’s not always correct. Grammarly and I tend to battle over compound sentences – it doesn’t always recognize them accurately. Grammarly will say I need a comma when I don’t or that I don’t need a comma when I do. Be sure to check yourself before you automatically accept Grammarly’s suggestions.
The final fun thing that Grammarly does is send you your weekly stats.
For example, last week I was more accurate than 58% of Grammarly users, but even better…I used more unique words than 97% of Grammarly users! I have absolutely NO idea what a “unique word” is in Grammarly’s computer brain, but I’ll take it. Thank you, Grammarly!
#8) Reading Out Loud
To catch awkward wording or confusing points, open your post in “preview” mode.
Next, read it OUT LOUD. I know, this sounds odd, but it’s truly the best way to catch awkward phrases because you’ll “hear” them and your ears can sometimes do a better job of catching those types of errors than your eyes.
Sharing Blog Posts
Once your post is done, you’ll want to make sure that people actually see it so they can read it. I share blog posts in two ways: optimizing posts with SEO and sharing on social media.
#9) Yoast SEO
The Yoast plugin is a fabulous plugin for walking you through optimizing your post. You need to find your keywords and add them to your post, and there are lots of tools out there for that, but adding those keywords and meta descriptions to a post is super easy with Yoast.
I use the Yoast plugin for every single blog post and those optimized posts absolutely drive traffic to my website.
If SEO makes zero sense to you, I have an SEO Basics course available that teaches the basics of what SEO is and how to optimize your website’s pages and posts so Google can find you.
Some people prefer to do their SEO work prior to writing, others (like me), prefer to do it after. It doesn’t really matter when you do your optimizing, just be sure to do it.
#10) Social Warfare
My final favorite tool for blogging is the Social Warfare plugin. If you look at the bottom of the blog post, you’ll see links for sharing this post on Facebook and Pinterest. I use the free version, but the premium version has some cool features and isn’t too much at $29/year.
Conclusion
There’s no need to rely on 78 different tools for every single blog post. In fact, the number of tools and resources alone can get overwhelming.
Simplify your blogging process: brainstorm, research, write, add a pic, edit, and share.
Use the tools listed in this post to assist with that process: pen & paper, WordPress Editorial Calendar, DeepDyve & Google, photo sites, Canva, Grammarly, reading aloud, Yoast, and Social Warfare.
You don’t need much to blog effectively.
The goal is to get relevant and credible blog posts written and published, posts that will help you grow your business, not show off how many fancy tools you can use.
If you’re still not sure that you should bother with blogging, you should. It’s totally worth it. This post on why you should blog as a small business owner will explain all the benefits.
What are your favorite tools for writing blog posts and keeping the whole process as simple as possible? I’d love for you to share in the comments.
xo,
Amy