

As kids, we all played the game of hide and seek. Remember? Somebody is “IT.” They count to 100 while everybody else scrambles to get the BEST hiding place and avoid being the next “IT.” Soon enough, IT is on the hunt to find all of their buddies.
That’s a super fun game, until you start searching and find things you’re not quite expecting!
Last month, I was writing a new post and wanted to reference another blog post and review what I’d already written. So, I clicked over to my site and typed a term into my search bar that I knew would get me to that blog post.
Guess what showed up in the search results?
I found the post I was looking for, AND my site had also conveniently listed several pages that had content that I’d provided as lead magnets, or optins.
In other words, people could access my “hidden” content if they hit on the right search term. All of my “freebies” are linked to Thank You pages on my site. These Thank You pages are hidden from a Google search but NOT a search on my site which means a quick search on my site returned results that I didn’t want random visitors accessing. Uh-oh.
I hadn’t realized that hiding a page from Google did NOT hide it from an onsite WordPress search.
Why Hide Pages and Exclude them from Search Results
If you’re running a membership site or online courses, you might have content that you want to hide.
Or, if you’ve got PDF’s, audio meditations, videos etc. embedded on pages on your website only to be accessed if somebody opts-in to your list, you’ve got to make sure these pages are hidden from Google AND from the WordPress search function.
To check if visitors have access to your premium content that’s only for subscribers, type a keyword that relates to some of this premium content into your search bar and see what comes up in the search.
If your premium content shows up in the results…let’s hide it.
Step #1 – Install plugins to Hide Content
The first plugin you’ll need to install and activate is Yoast. You should have this plugin and you should be using it for every post and page on your website to drive traffic, but if not, go ahead and install it now.
The next plugin you’ll need to install and activate is called Search Exclude.
If you’re not sure how to install a plugin, follow the steps in the tutorial below. It’s super easy.
To learn how to update your plugins safely, easily, and affordably, watch this Website Workshop on keeping your site updated and backed up.
Step #2 – Hide your Content from Google
We’re going to use the Yoast plugin to hide your content from Google.
If you don’t have the Yoast plugin installed, follow the steps in the above video and install it.
Once you’ve got the plugin installed and activated, scroll down to the bottom of your post/page editor, and you’ll see the Yoast box below the text editor box. This box will appear on every page and post on your website. If you can’t see all of the settings, click on the little arrow to the right of the title to access the settings.
Once the settings are open, click on the little settings-cog-wheel that’s on the left side below the stop-light and the DNA looking thing. I have no idea what the settings cog is officially called, but it’s highlighted in the image below.
Click there.
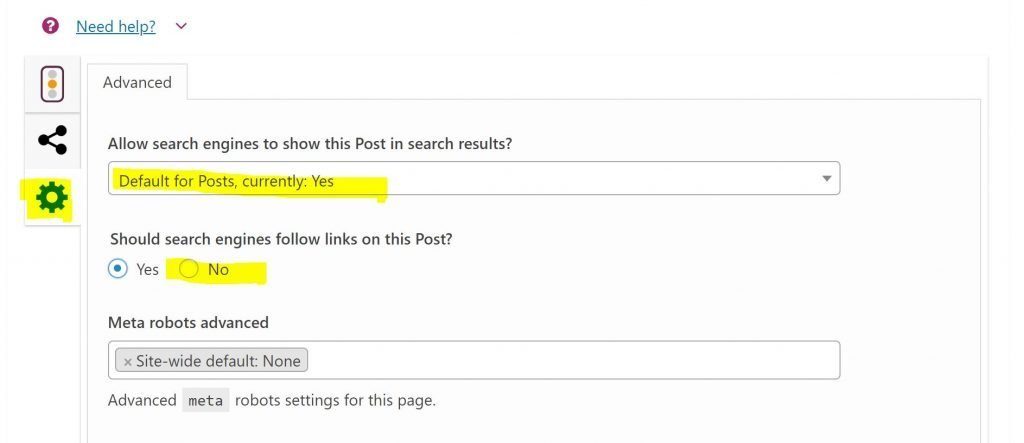
When the settings tab opens, you’ll see text that says, “Allow search engines to show this Post in search results?”
The default setting for this is Yes. Switch that to NO. Then, click NO next to “Should search engines won’t follow the links on this post?” You want to hide the whole thing page/post from all search engines.
Go through your website and update these settings for all pages and posts that you don’t want to appear in Google search results.
Step #3 – Hide Your Content from On-site WordPress Searches
The next step is to hide this page from on-site searches.
You’ll need to install another plugin called “Search Exclude.” Follow the instructions in the above video to install and activate Search Exclude.
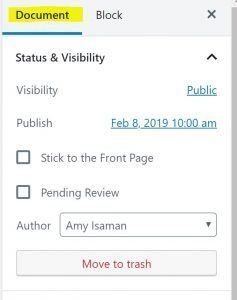
Once it’s installed, if you go to any page or post, click on the Document tab that’s at the top of the right sidebar. This is if you’re on the WordPress 5.0 or higher. If you’re not on the most recent version of WordPress, you’ll just see Search Exclude in the right sidebar.
Next, scroll down until you see an option that says “Search Exclude.”
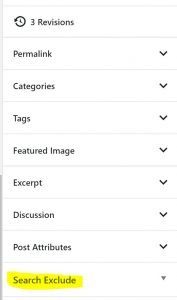
Click on that box and check the box to exclude that page from all on-site search results.

And that’s it!
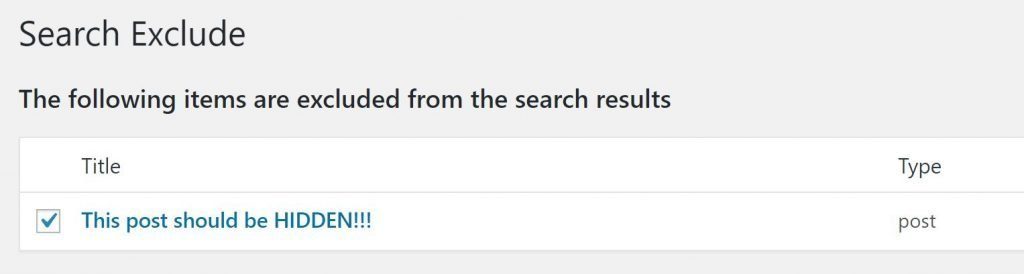
To check which pages you’ve excluded, hover over the Settings option in the left sidebar of your WordPress dashboard. You’ll see a Search Exclude Option. Click there.
This is a list of all pages and posts that you’ve hidden from search results. You can toggle those pages on or off from here.
Conclusion
Right now, while you’re thinking of it, take some quick action. Head over to your website and take a look at your list of pages. Are there any at all that you don’t want people inadvertently accessing with a random search?
If so, install the Yoast and Search Exclude plugins, so you’re sure that your premium content isn’t appearing in Google or on-site searches.
You work hard on that content, and you’re running a business, so make sure that your exclusive content is just that…exclusive to your subscribers and/or clients.
xo,
Amy
P.S. Here’s a list of my favorite and recommended plugins as well as some info on how to know if a plugin is legit. Also, be sure to grab the Website Workshop on keeping your site updated